On the tenth day of Gitmas, my mentee asked of me… what does “PR” mean?
what’s a branching strategy,
what’s this gitignore thing,
push-ing, pull-ing, diff-ing,
what is SSH-ing,
how do I connect these,
what’s this “GitHub” of which I’ve heard,
Git’s ready – what then,
how do I get Git set up,
and could you explain Git, pretty please?
Now that we know how to branch out of the main branch, we need to know how to merge your branch back in!
There are a couple of ways to go about this. If you’re working on a smaller personal project, you can technically just directly merge your branch back into the master branch. But if you’re working on a project for a company, or an open source project, or pretty much any time you’re working with other people, you should create a pull request.
What is a pull request?
A pull request (aka PR) is essentially a request to merge the changes you made in one branch into another branch. This allows the repository owner or other designated reviewers to look over your code, make sure things are working, and confirm that this is a change that should be merged in. They may ask you to make changes, or leave comments asking you to explain something in your code. Once everyone approves the PR, it can then be merged into the target repository.
It’s a good idea to always check the README, any other documentation, previously-merged PRs, or to talk to the rest of the team to make sure you know how they want PRs to be done. This process can often be different from project to project!
So how do you create a PR?
First things first, make sure you git commit all the changes you’ve made in your branch.
Then, git pull down any updates that have been made to the branch you’re intending to merge into (we’ll refer to this as the target branch).
git checkout [target branch]
git pull
git checkout [your working branch]
Merge the target branch into your working branch, so your working branch is up to date and won’t have any merge conflicts once the PR is approved. (If it takes a while to get approval, you may have to do this several times in order to make sure your working branch stays up to date. PRs with merge conflicts can’t be merged in!)
Make sure you’re on your working branch and run:git merge [target branch]
If there are merge conflicts, Git will yell at you, and now is when you deal with them.

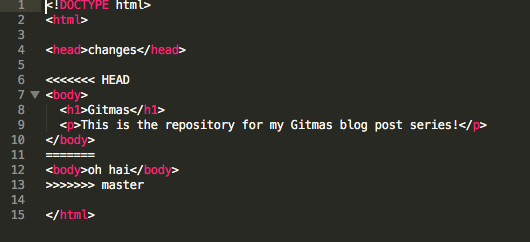
Go into the file(s) that have the merge conflicts, and search for <<<<<<<. The file will show the changes you made, and the incoming changes from the other branch.
Edit as needed – you can choose to keep your changes, keep the incoming changes, or make any necessary changes needed to keep both changes. (If you’re unfamiliar with the incoming changes, talk to the developer who made them, or the person in charge! You definitely don’t want to be accidentally deleting someone else’s work that’s supposed to be in the codebase.)
Once you’ve fixed all the merge conflicts (there can be multiple instances in a single file, or multiple files involved – make sure you get all of them!), I HIGHLY recommend re-running and re-testing your code to make sure everything works as expected. Sometimes merge conflicts can be tricky, so you want to make sure you’re not trying to merge broken code once you submit your PR.

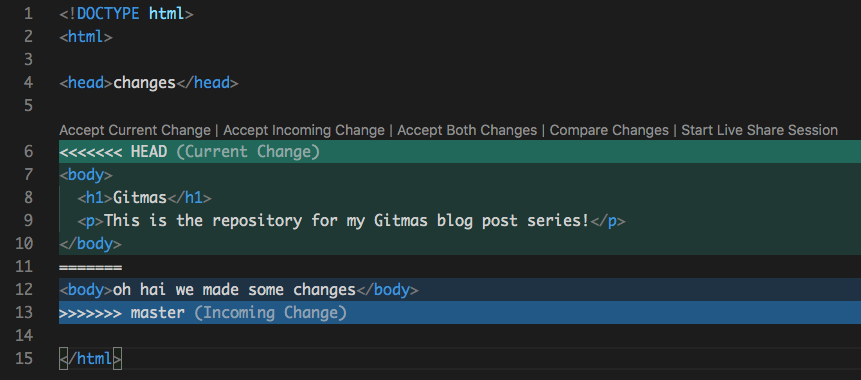
If you’re using VS Code, things are a little easier. In the sidebar, the little symbol with the three circles and lines is your source control tab. Click on that, and you’ll see the files that are currently staged for commit (“Staged Changes“), the files that aren’t staged (“Changes“), and the files that have merge conflicts (“Merge Changes“).

If there’s nothing under Merge Changes, then you have no merge conflicts. But if you do, then click on one of the files. Somewhere in the file, you’ll see a section that looks like this:

This shows the two versions of that portion of the file that are conflicting with each other. Right above it is a list of links you can click for different actions:
If you want to keep your changes only, click “Accept current change“.
If you want to keep the changes from the target branch and discard your changes, click “Accept incoming change“.
If you want to keep both, click “Accept both changes” (but keep in mind that sometimes this may leave out things that existed in both versions, such as a closing brace, so make sure to check that the code looks and works right after doing this!)
“Compare changes” opens the two versions of the file side by side so you can see in a different format how things have changed.
Once you’ve fixed any merge conflicts and are certain everything works correctly, git commit your changes again. Git will automatically fill in the commit message for you, so you can just accept this message and continue.

git push your working branch, then go to GitHub to create your PR.
On GitHub, if you’ve recently pushed a branch, then you may have a light yellow bar with a green “Compare & pull request” button. If you have that, then click it; if not, click the “New pull request” button next to the branch dropdown on the left.

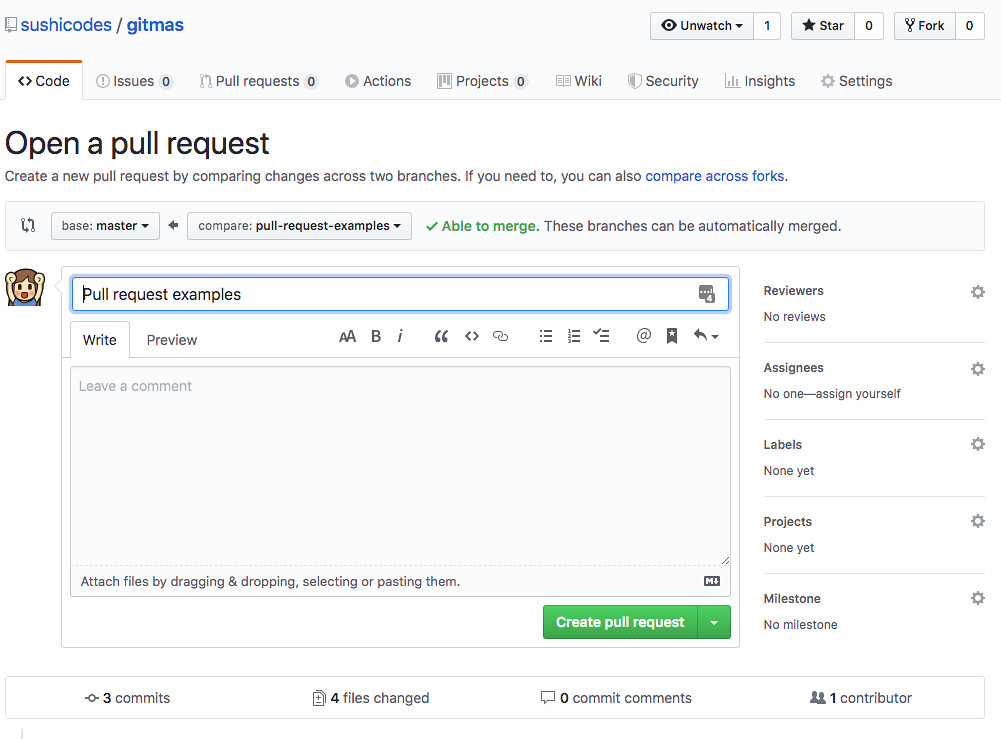
If you’re manually creating a PR, then on the next page, make sure the “base” branch is your target branch (the one you want to merge your changes IN to), and the “compare” branch is the new branch you’ve been working on. (If GitHub already knew which branch you’re merging, and you clicked the “Compare & pull request” button, then you’ll skip this page.)

Once you’ve chosen your branches, you’ll see a form. Here you can write a title and description for your PR, as well as choose reviewers or add any other appropriate information. A lot of this will depend on the preferences of the people or team who own the repository – they may require certain information be in your PR, or that things are formatted in a specific way, or that you label your PR correctly.
Regardless, it’s always a good idea to be descriptive when submitting a PR. Explain the issue you’re solving, and link to any relevant tasks or issues. Include screenshots showing the before and after of what you fixed, or a gif showing the new feature in action. Include instructions for how to test the fix or view the new feature – assume you’re writing for someone who’s completely unfamiliar with the project, and be as clear as possible with your instructions.

Once you’re happy with your PR, click the big green “Create pull request” button at the bottom of the form – and there’s your PR!

From here, keep an eye on your PR. Remember to merge in your target branch regularly, so your branch stays up to date. If your reviewers leave comments about changes they would like to see or issues they’ve found, you can make any necessary changes locally, and then git commit and git push as usual – once you push, your new changes will show up in your PR. Sometimes reviewers will leave comments asking questions about your code, or suggesting a different way of doing things, in which case you can reply to their comments directly on GitHub.
Depending on the team, you may have to wait for build processes to pass before merging. If you’re unfamiliar with this, talk to your team! There’s often someone who will be happy to explain all their processes to you.
Once your PR has been approved by the reviewers, now it’s time to merge! Make sure you know what the process is for the project you’re working on – sometimes, someone specific will do the merge; other times, you can merge your own PR once you have the required number of approvals. As soon as your PR is merged, congratulations! Your code is now part of the main codebase.
Have you tried creating a PR yet? What was the first project you contributed to? I’d love to hear from you in the comments!
If you have any other questions about Git or requests for other topics you’d like to see me blog about, please leave a comment! And if you’re enjoying this series, consider supporting me on Patreon, following me on Twitter or checking out my coding or cooking Twitch streams!
